Pin bar trading strategy is one of the easiest and safest ways to trade in the forex market. Importantly, you need to know which pin bar to pick and which to avoid.
The best way to pick a pin bar is from 4-hour and daily charts. You can pick a pin bar from weekly charts too.
However, it is not advisable to pick a pin bar from lower time frames like 1 hour, 30 min, or 15 min charts. On a lower time frame, you may have a false signal rather than good price action signals.
Basic Features of the Pin Bar
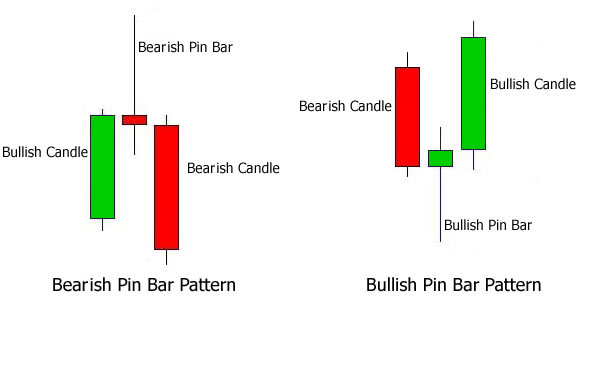
A pin bar is characterized by a candle having a little body and large wick. A pin bar can either be bearish or bullish.
If the pin bar has a large wick at the top with a small body, then it is bearish Pin Bar. On the other hand, if the pin bar has a large wick at the bottom with a small body, then it is bullish Pin Bar.
Pin Bar from Key Support / Key Resistance Zones
Before picking a pin bar, you have to be sure that the pin bar is coming from key support zones or key resistance zones.
Keep in mind that if the pin bar is bearish it has to come from a key resistance zone. And, if the pin bar is bullish, it has to come from a key support zone.
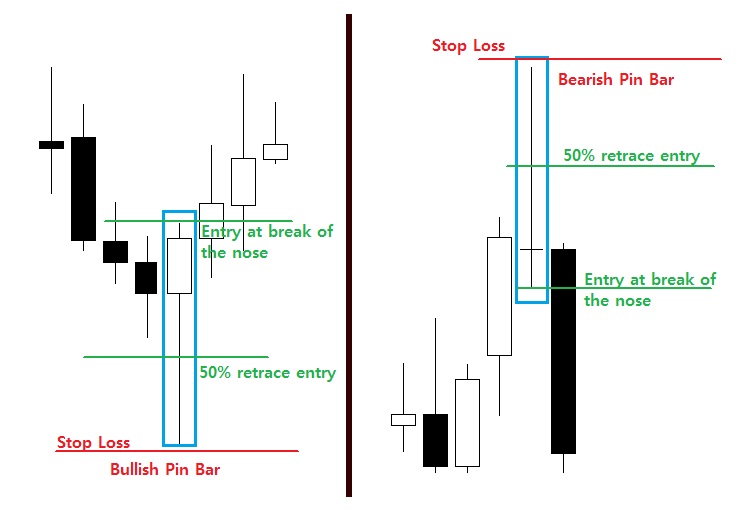
Trade Entry Trick:
Most of the times, pin bar retraces back to 50% before moving towards its destination. So the best idea will be a “sell/buy limit” at the 50% of that pin bar.
If you think that the pin bar is strong enough and will not retrace back to 50%, you may place a “sell/buy stop” at the break of the nose of that pin bar. However, your stop loss will be higher because on both cases your stop loss should always be above the bearish pin bar or below the bullish pin bar.
Even though there it is not easy to get a holy grail system in forex trading, you will emerge a victor if you maintain your trading strategy and become disciplined. You need to wait for the actual price action signal to come. Go for the quality of the trade set-up and not for the quantity of trades you need to take.
Let’s take a look on the following example:
On a USDJPY Daily Chart (New York Close Chart)
April 3rd: A Bearish Pin bar came from the key resistance zone (104.120) and hence price fell down. So, the best idea was to place a “sell limit” at 50% of the Pin bar (104.00) to have tighter stop loss (104.166) or to place a “sell stop” at the break of the nose of that pin bar(103.786) having higher stop loss (104.166).
April 15th: Bullish Pin bar formed near the key support zone (101.206) and hence price moved up. Here trade idea was to place a “buy limit” at 50% of the pin bar (101.677) to have tighter stop loss (101.437) or to place a “buy stop” at the break of the nose of that pin bar(102.00) having higher stop loss (101.437).
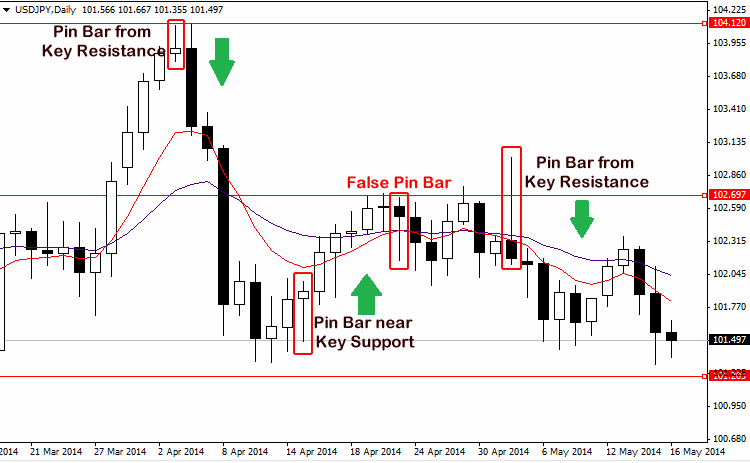
April 23rd: Bullish pin bar was created below the key resistance Zone (102.697) and hence price fell down instead of moving up, so it was a False Pin Bar. If it were a bearish pin bar near key resistance zone, only then it may have given a good price action signal.
May 2nd: Bearish pin bar coming from key resistance zone (102.697) and showed good price action signals. If you put a “sell stop” at the break of the nose of that pin bar (102.047), you can easily get 1R profit (Take profit is 1 times greater than the Stop loss).
In case of an upward trend, minor resistance levels might frequently break alongside the pattern, so don’t be concerned of taking a decent confluent setup simply because a minor resistance level is close nearby.
In the event that there’s a key resistance level just above the pin bar, try to consider not entering the market until the market decides whether it wants to break the key resistance level or retrace lower (the inverse is true for a downtrend).
Pin Bar from Bollinger Bands
A bearish pin bar from upper bollinger bands indicates that the price may fall down. On the other hand, a bullish Pin Bar from lower bollinger bands indicates that the price may go up.
Trade Entry Trick:
Pin bar may come from key support / key resistance zones or from upper or lower bollinger bands. But the entry trick is same for both cases. We will wait for 50% retrace entry to have a tighter stop loss. We may also place a “sell/buy limit” at the 50% of that pin bar. But stop loss must have to be placed at the bottom of that pin bar.
Take a look on the following example:
On the NZDUSD Daily Chart (New York Close Chart)
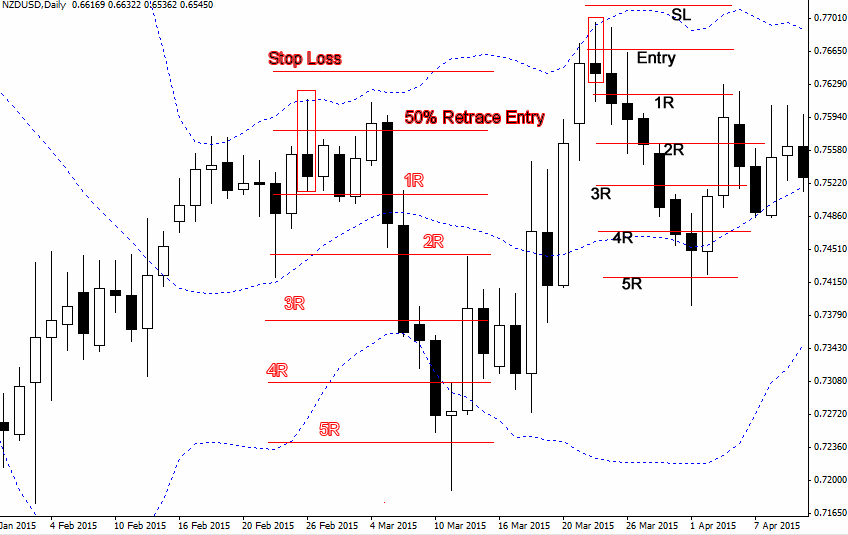
February 26th: A bearish pin bar came from the upper bollinger bands and hence price fell short. In that case, the best idea was to place a “sell limit” at 50% of the Pin bar to have a tighter stop loss. If you enter the market at the 50% retrace label of the pin bar you could win 5R profit (Take profit is 5 times greater than the Stop loss).
Same thing happened on 25th March. A Bearish Pin bar came from upper bollinger bands and hence price falls short to give 5R profit.
Key Note:
- We will look for a Bearish Pin Bar at or near a Key Resistance Zone.
- We will look for a Bullish Pin Bar at or near a Key Support Zone.
- Trade entry will be “sell/buy limit” at 50% Retrace Level of the pin bar for safest stop loss.
- Trade entry may be “sell/buy stop” at the break of the nose of that pin bar.
- Stop Loss will be above on Bearish Pin bar or below on Bullish Pin bar.
I enjoy the different shades!
I use this very same method!! I also use the RSI sometimes for confirmation (if you see divergence then go for it). A very simple and effective method.
But I have this problem: I usually miss trades, don’t know why. Probably lack of discipline. What would you recommend me to do to fix this problem?.
Thanks!
Here are some strategies you can implement: https://www.forextradingbig.com/how-to-make-perfect-trade-entries-7-secrets/
All the best.